In this post I have documented my efforts to get libreboot running on a pair of Lenovo ThinkPad T420's that I found in Umeå Hackerspace. The motivation is that I needed a new laptop, the ThinkPads were there, but they didn't support the SSD in my current laptop. I could of course just go and buy a new laptop, but my precious freedoms!
The following is based on the information on the libreboot website for the Ivybridge and Haswell (and Sandybridge) series of Intel CPUs here, and the general install instructions here. Some inspiration has also been taken from this instructables post. The hardware manual will also be of use.
This post is quite lengthy and some disassembly is required. The price of freedom is eternal fiddling.
Overview
The process involves three major steps:
- Acquiring the current BIOS ROM
- Compiling the new ROM and injecting BUP
- Flashing the new ROM
Hardware and tools
- Lenovo ThinkPad T420
- An x86_64 machine running Debian or Ubuntu
- Raspberry Pi Zero (or any other Pi)
- Pomona SOIC-8 test clip
- Six 1x1 female-female DuPont test leads
- Screwdriver set
- 5 mm hex socket
- Pliers
- Tweezers
- Thermal grease
- Isopropanol (IPA aka 2-propanol)
- Compressed air (actually God's gas, propane
 )
) - Tape
Preparing the Pi, increasing µSD life
This section is a bit of a tangent, but I thought it might be useful to someone. Here I will sumarize what preparations I did before doing any libreboot stuff on the Pi.
Whenever you boot a Raspberry Pi for the first time it will ask for things like the WiFi password. It will also attempt to upgrade all packages installed, which in my case didn't work automatically. Instead I had to do it manually, roughly like so:
pi@pizero0:~ $ sudo apt update && sudo apt upgrade --yes && sudo apt dist-upgrade --yes
This takes a while. The reason for this is that Debian Buster is now oldstable rather than stable. I went for coffee at a local book shop while it was running.
I also set the Pi up to log to RAM, to put temporary files also in RAM, and I disabled the swap. This in order to prolong the life of its µSD card.
pi@pizero0:~ $ cat <<EOF | sudo bash -c "cat >> /etc/fstab"
tmpfs           /tmp            tmpfs   defaults,noatime,nosuid 0 0
tmpfs           /var/log        tmpfs   defaults,noatime,nosuid,size=16M 0 0
EOF
pi@pizero0:~ $ sudo apt remove --yes dphys-swapfile
Jonasbits helpfully informed me that DietPi exists which would likely be helpful here. For now I use the stock NOOBS.
Acquiring the existing ROM
Reading the BIOS ROM involves these steps:
- Compiling
flashromon the Pi - Disassembling the T420
- Connecting the SOIC-8 test clip and reading the ROM
Setting up flashrom on the Raspberry Pi
Use the Raspberry Pi configuration tool to enable SSH and SPI.
Make sure you can SSH into the Pi, because having to use a second screen can be annoying.
Also make sure the device /dev/spidev0.0 exists. Reboot.
SSH into the Pi and follow the instructions here for installing flashrom:
pi@pizero0:~ $ git clone https://notabug.org/libreboot/lbmk
pi@pizero0:~ $ cd lbmk/
pi@pizero0:~/lbmk $ sudo ./build dependencies ubuntu2004
pi@pizero0:~/lbmk $ ./download flashrom
pi@pizero0:~/lbmk $ ./build module flashrom
Disassembling the T420
Get your tools out!
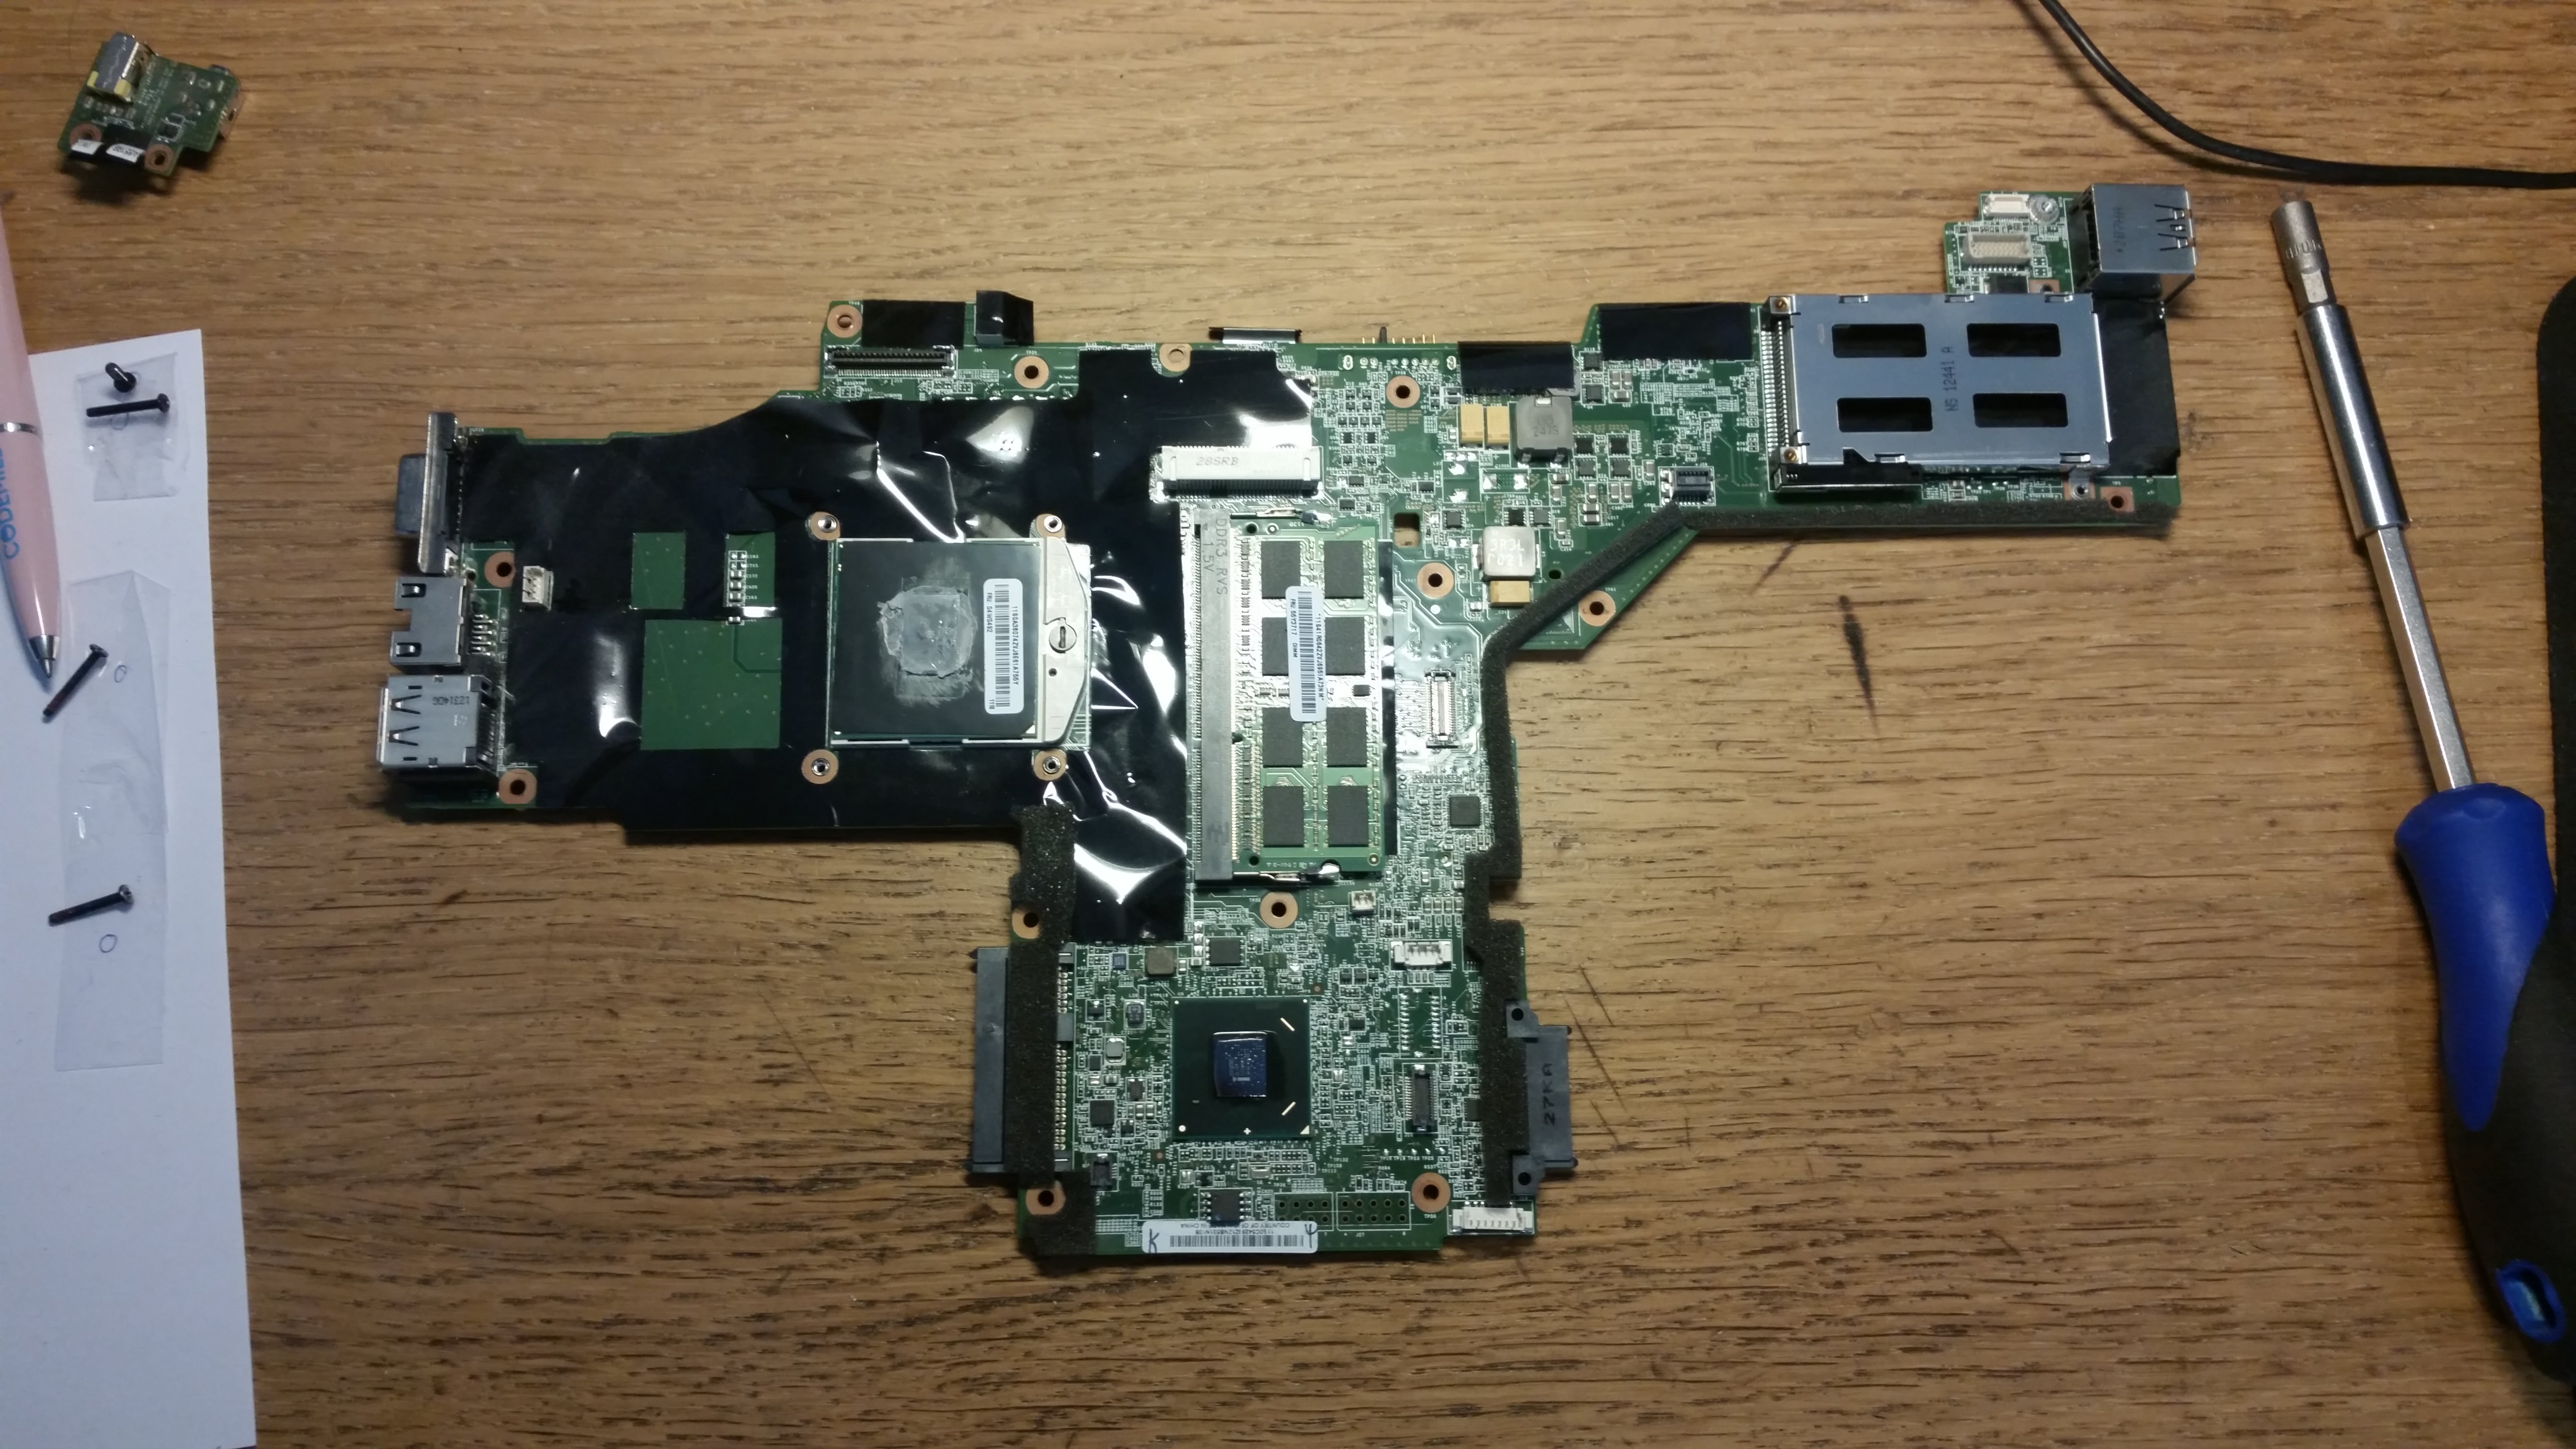
Disassemble the T420 per the hardware manual. Follow in particular the section "1200 Magnesium structure frame" on page 110. It in turn points to these sections, to be done in the order given:
- “1010 Battery pack” on page 67
- “1020 ExpressCard blank bezel” on page 68
- “1030 Serial Ultrabay Enhanced device or travel bezel” on page 69
- “1040 Hard disk drive (HDD) and solid state drive (SSD)” on page 70
- “1050 DIMM slot cover” on page 73
- “1070 PCI Express Mini Card for wireless WAN” on page 75
- “1080 Keyboard” on page 77
- “1110 PCI Express Mini Card for wireless LAN” on page 85
- “1120 Keyboard bezel assembly, FPC cable, and Bluethooth daughter card” on page 87
- “1150 Speaker assembly” on page 95
- “1160 LCD unit” on page 97
- “1170 Fan assembly” on page 101
- “1180 CPU” on page 105
- “1190 Base cover assembly and DC-in connector cable” on page 106
I could not figure out how to remove the SmartCard reader, but luckily disconnecting it is enough.

Locate the ROM chip. Its part number is Winbond 25Q64CVSFIG (SOIC-8 208-mil variant, 32nd week of 2012). Note that the T420 only has one chip, not two chips like other Ivybridge/Haswell machines might have (libreboot's install instructions agree on this).
While you have everything disassembled, give things some compressed air blasts to get rid of dust, especially in and around the cooling fan. Don't overdo it though, fans deal poorly with infinite RPMs.
Reading the ROM
First wire up the SOIC test clip to the Pi. The table and picture below hopefully shows how to do this clearly enough:
| Name | Color | Test clip pin# | Pi pin# |
|---|---|---|---|
| /CS | brown | 1 | 24 |
| MISO (DO) | yellow | 2 | 21 |
| not connected | 3 | ||
| GND | black | 4 | 6 |
| MOSI (DI) | orange | 5 | 19 |
| SCLK (CLK) | green | 6 | 23 |
| not connected | 7 | ||
| VCC | red | 8 | 1 |
2025-12-11 update: Added entries for unconnected pins. Thanks to Brante Gordin for pointing this out. Gordin also suggests CH341A users should connect HOLD (pin 7) to VCC.
This picture is exactly how I connected the two:
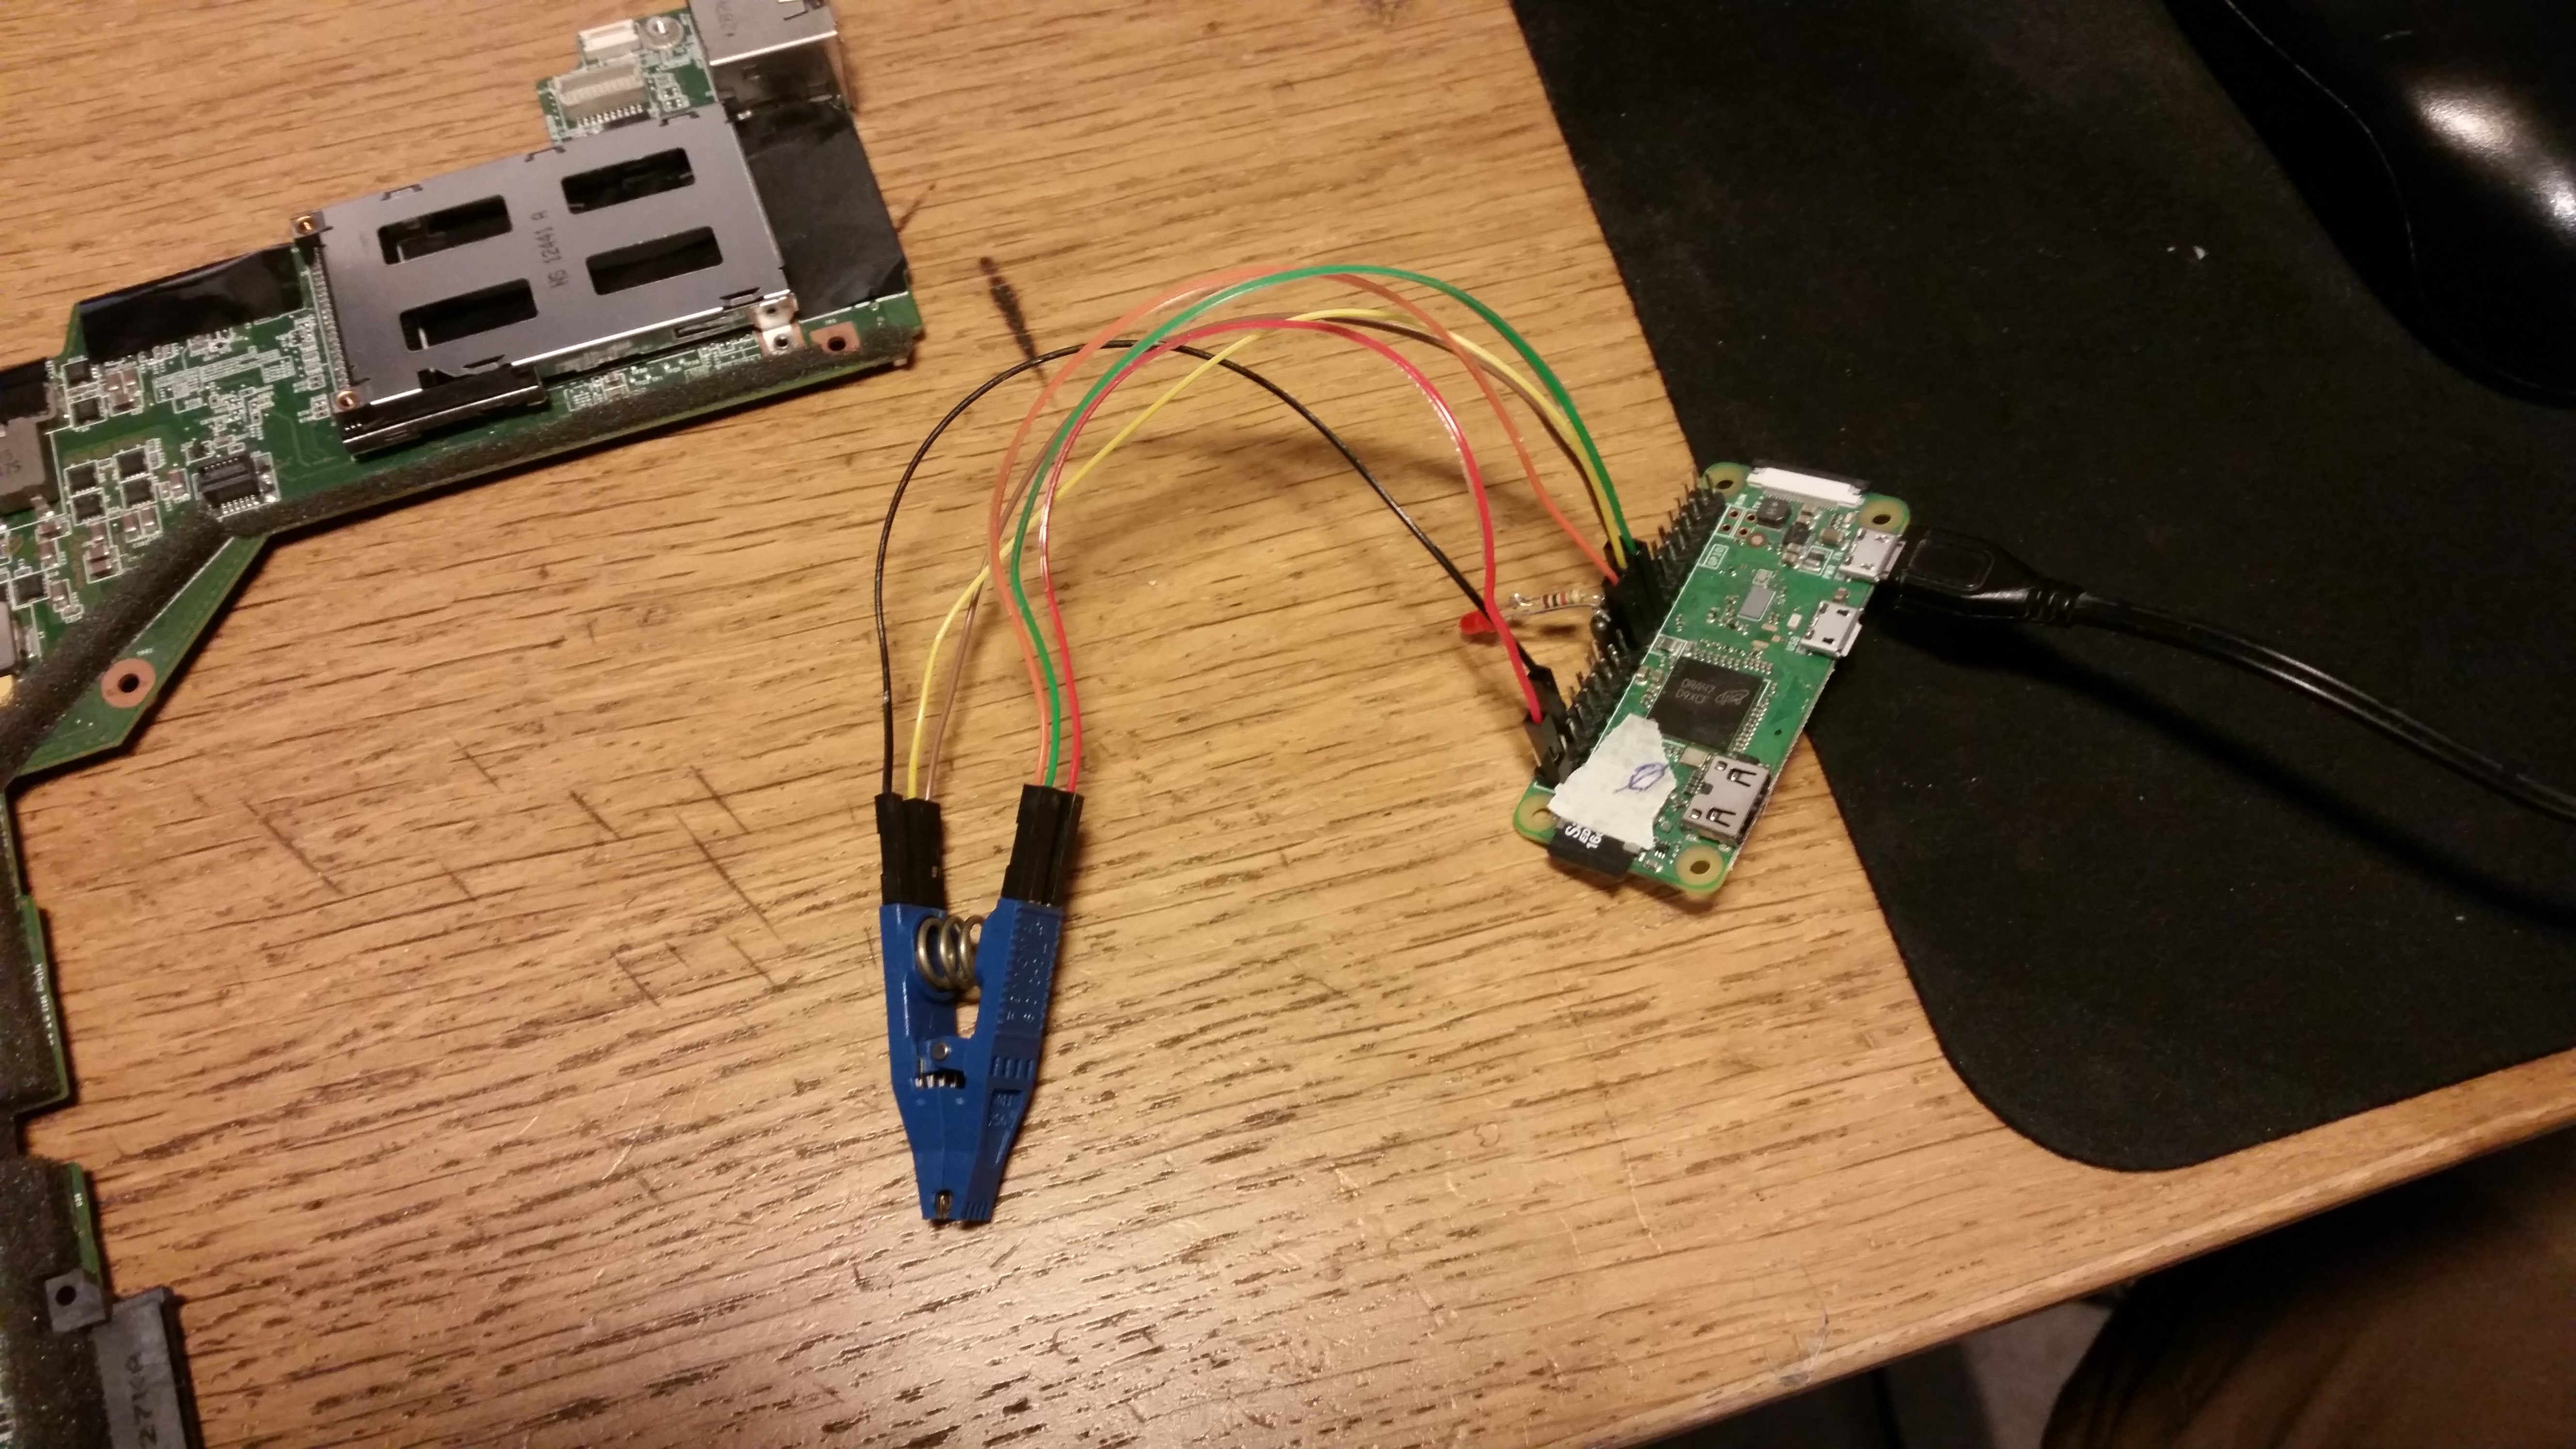
Before attaching the clip to the motherboard, make sure the Pi is not connected to power. The connect the test clip as shown in the picture below.
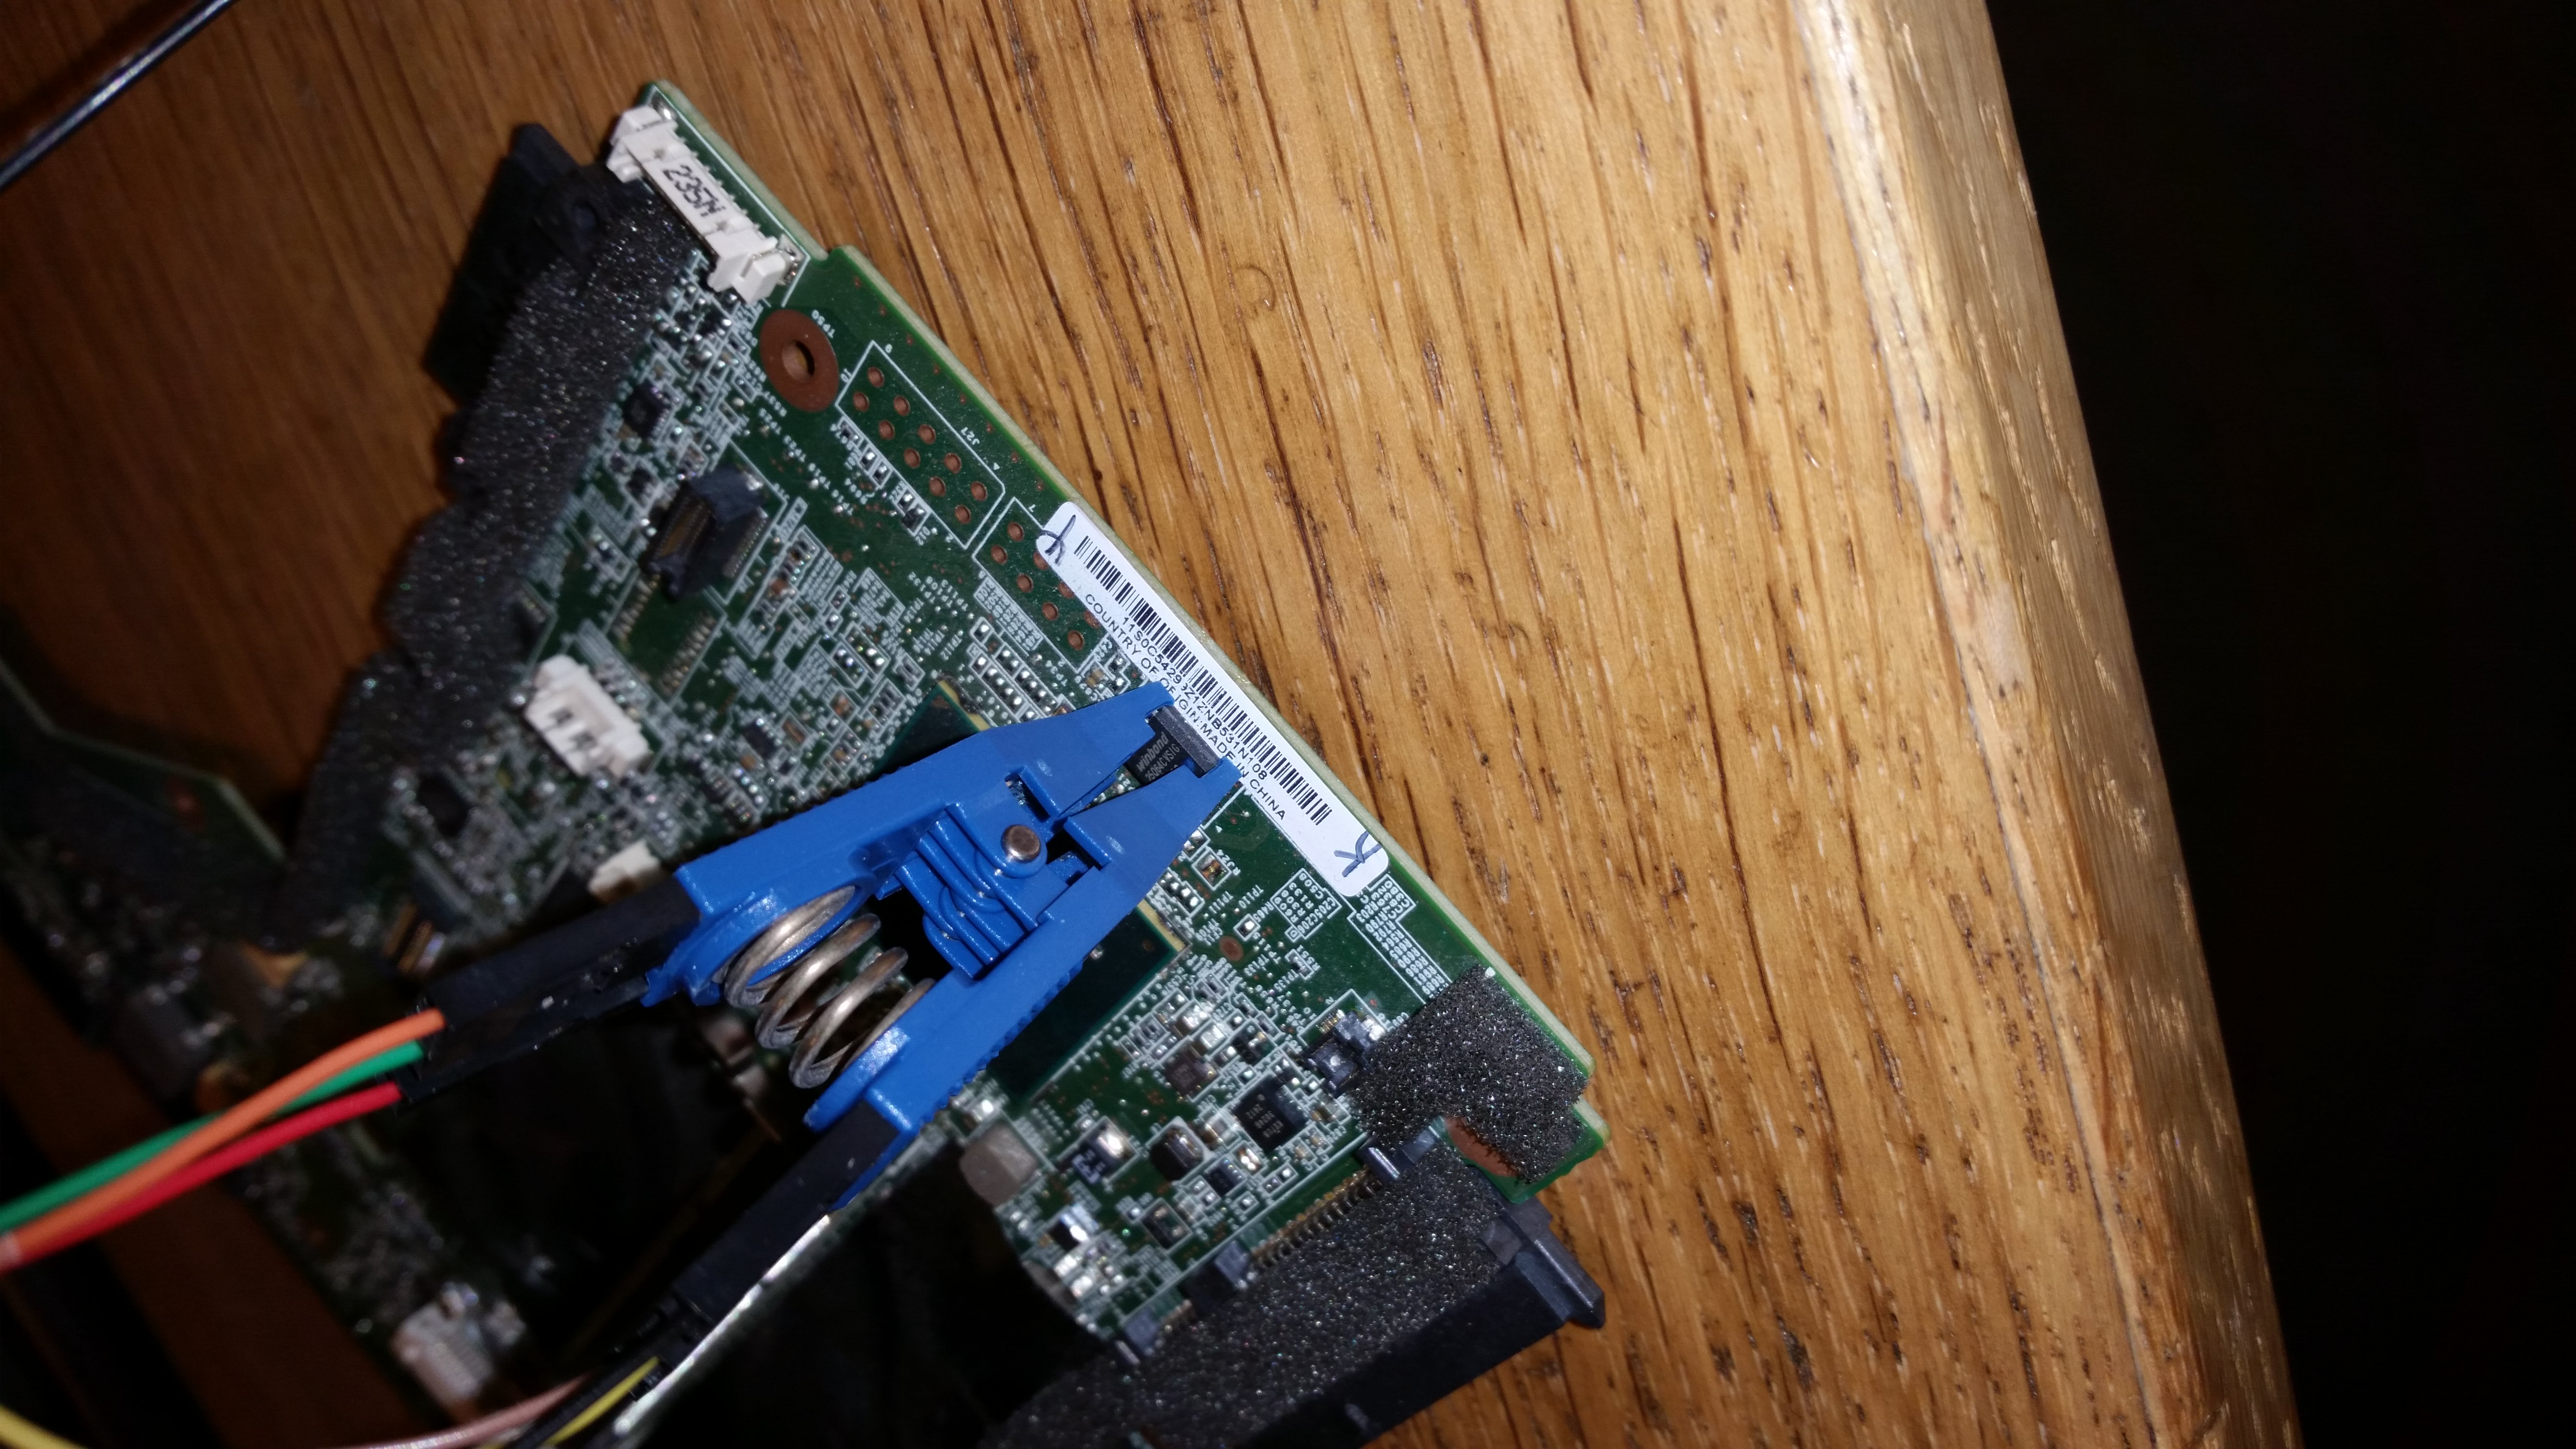
MAKE SURE THE ORIENTATION OF THE TEST CLIP IS CORRECT OR YOU WILL LIKELY FRY THE MOTHERBOARD. The VCC pin is in the upper right corner, opposite the indentation on the package. The indentation indicates pin 1, and IC pins are counted counterclockwise. This is a holdover from the vacuum tube days. Pin 8 is therefore the top-right pin. GND is the bottom-left.
After this, connect power to the Pi. SSH into the Pi and probe the ROM using flashrom:
pi@pizero0:~ $ sudo flashrom -p linux_spi:dev=/dev/spidev0.0,spispeed=32768
flashrom  on Linux 5.10.103+ (armv6l)
flashrom is free software, get the source code at https://flashrom.org

Using clock_gettime for delay loops (clk_id: 1, resolution: 1ns).
Found Winbond flash chip "W25Q64.V" (8192 kB, SPI) on linux_spi.
No operations were specified.
flashrom successfully identified the chip.
Dump the ROM:
pi@pizero0:~ $ sudo flashrom -p linux_spi:dev=/dev/spidev0.0,spispeed=32768 -r dump.bin
I ran four more dumps using a bash loop like so:
pi@pizero0:~ $ for x in $(seq 1 4); do sudo flashrom -p linux_spi:dev=/dev/spidev0.0,spispeed=32768 -r dump$x.bin ;done
Use sha1sum to verify that they're all the same:
pi@pizero0:~ $ sha1sum *.bin
d92c6217cb7dbc3e8cf5bbd1cd59ade4b10aef4e  dump1.bin
d92c6217cb7dbc3e8cf5bbd1cd59ade4b10aef4e  dump2.bin
d92c6217cb7dbc3e8cf5bbd1cd59ade4b10aef4e  dump3.bin
d92c6217cb7dbc3e8cf5bbd1cd59ade4b10aef4e  dump4.bin
d92c6217cb7dbc3e8cf5bbd1cd59ade4b10aef4e  dump.bin
A dump of another T420 had the SHA-1 hash 4f006fff0a1e7e2613e15dbb452b7009d19d00e6, so ROMs are definitely different across laptops.
I renamed blob.bin to t420.bin after this.
Finally copy t420.bin to your main machine using for example scp.
Building the new BIOS ROM
In order for libreboot's lbmk to be able to do its thing you will need to use Debian sid or similar.
Since I didn't want to bring my machine to a potentially unstable state I decided to make use of docker instead.
On the x86 machine, in the same directory that you have t420.bin paste the following into a file called Dockerfile:
FROM debian:sid
RUN apt update
RUN apt install --yes gettext git
RUN git clone https://notabug.org/libreboot/lbmk
WORKDIR /lbmk
RUN ./build dependencies debian
RUN git config --global user.email ""
RUN git config --global user.name "root"
COPY t420.bin /lbmk
RUN ./blobutil extract t420_8mb t420.bin
RUN ./build boot roms t420_8mb
RUN for f in bin/t420_8mb/*.rom; do ./blobutil inject -r $f -b t420_8mb; done
Apart from building a bunch of ROMs this will also inject the one disgusting but unfortunately necessary Intel ME blob, BUP (bringup), taken from t420.bin.
The gettext install may currently (as of f9e20b8a1d93dec3b6389ca9a7575765c9cc733d) be necessary due to some kind of change in Debian.
This issue has been fixed as of the commit after that (ebd9ec96c464d73e5667acf0a0735afec10e961a) but some readers may be using older lbmk's.
Moving on, to build the ROMs and copy them out of docker run the following:
docker build -t t420 -f Dockerfile .
ID=$(docker create t420)
docker cp $ID:/lbmk/bin/t420_8mb .
docker rm $ID
After quite some time (50 minutes on my machine) this will create a directory t420_8mb with the following files inside:
- grub_t420_8mb_libgfxinit_corebootfb_colemak.rom
- grub_t420_8mb_libgfxinit_corebootfb_deqwertz.rom
- grub_t420_8mb_libgfxinit_corebootfb_esqwerty.rom
- grub_t420_8mb_libgfxinit_corebootfb_frazerty.rom
- grub_t420_8mb_libgfxinit_corebootfb_frdvbepo.rom
- grub_t420_8mb_libgfxinit_corebootfb_itqwerty.rom
- grub_t420_8mb_libgfxinit_corebootfb_svenska.rom
- grub_t420_8mb_libgfxinit_corebootfb_trqwerty.rom
- grub_t420_8mb_libgfxinit_corebootfb_ukdvorak.rom
- grub_t420_8mb_libgfxinit_corebootfb_ukqwerty.rom
- grub_t420_8mb_libgfxinit_corebootfb_usdvorak.rom
- grub_t420_8mb_libgfxinit_corebootfb_usqwerty.rom
- seabios_withgrub_t420_8mb_libgfxinit_corebootfb_colemak.rom
- seabios_withgrub_t420_8mb_libgfxinit_corebootfb_deqwertz.rom
- seabios_withgrub_t420_8mb_libgfxinit_corebootfb_esqwerty.rom
- seabios_withgrub_t420_8mb_libgfxinit_corebootfb_frazerty.rom
- seabios_withgrub_t420_8mb_libgfxinit_corebootfb_frdvbepo.rom
- seabios_withgrub_t420_8mb_libgfxinit_corebootfb_itqwerty.rom
- seabios_withgrub_t420_8mb_libgfxinit_corebootfb_svenska.rom
- seabios_withgrub_t420_8mb_libgfxinit_corebootfb_trqwerty.rom
- seabios_withgrub_t420_8mb_libgfxinit_corebootfb_ukdvorak.rom
- seabios_withgrub_t420_8mb_libgfxinit_corebootfb_ukqwerty.rom
- seabios_withgrub_t420_8mb_libgfxinit_corebootfb_usdvorak.rom
- seabios_withgrub_t420_8mb_libgfxinit_corebootfb_usqwerty.rom
I used seabios_withgrub_t420_8mb_libgfxinit_corebootfb_svenska.rom.
Flashing the new ROM
Re-attach the test clip, again BEING CAREFUL THAT IT IS IN THE RIGHT ORIENTATION. Test that the connection is good:
pi@pizero0:~ $ sudo flashrom -p linux_spi:dev=/dev/spidev0.0,spispeed=32768
flashrom  on Linux 5.10.103+ (armv6l)
flashrom is free software, get the source code at https://flashrom.org

Using clock_gettime for delay loops (clk_id: 1, resolution: 1ns).
Found Winbond flash chip "W25Q64.V" (8192 kB, SPI) on linux_spi.
No operations were specified.
Finally flash your desired ROM:
pi@pizero0:~ $ sudo flashrom -p linux_spi:dev=/dev/spidev0.0,spispeed=32768 -w seabios_withgrub_t420_8mb_libgfxinit_corebootfb_svenska.rom
flashrom  on Linux 5.10.103+ (armv6l)
flashrom is free software, get the source code at https://flashrom.org

Using clock_gettime for delay loops (clk_id: 1, resolution: 1ns).
Found Winbond flash chip "W25Q64.V" (8192 kB, SPI) on linux_spi.
Reading old flash chip contents... done.
Erasing and writing flash chip... Erase/write done.
Verifying flash... VERIFIED.
Even though flashrom says that it verified the ROM I wanted to be extra sure:
pi@pizero0:~ $ sudo flashrom -p linux_spi:dev=/dev/spidev0.0,spispeed=32768 -r read.bin
flashrom  on Linux 5.10.103+ (armv6l)
flashrom is free software, get the source code at https://flashrom.org

Using clock_gettime for delay loops (clk_id: 1, resolution: 1ns).
Found Winbond flash chip "W25Q64.V" (8192 kB, SPI) on linux_spi.
Reading flash... done.
pi@pizero0:~ $ sha1sum seabios_withgrub_t420_8mb_libgfxinit_corebootfb_svenska.rom read.bin
e62ee26ab046d567004b907ba1950e819b60d252  seabios_withgrub_t420_8mb_libgfxinit_corebootfb_svenska.rom
e62ee26ab046d567004b907ba1950e819b60d252  read.bin
Congratulations! Your T420 is now librebooted!
At this point it may be useful to solder some thin wires to the programming header next to the BIOS ROM and making them accessible via the DIMM slot cover. I didn't end up doing this, but readers who plan on flashing many times may want to do so to save on having to disassemble more than once.
Now the only thing left to do is reassemble the T420. Remember to apply new thermal compound, and remember to re-enable the WiFi by sliding the kill switch on the right edge forward. I forgot this last step and was very confused why my WiFi wasn't working 😑 I also had an issue with the my second 8 GiB DDR3 stick not being detected, but reseating it fixed that issue.
I did the same procedure to a second T420 and it seems to have worked mostly fine. There is some kind of issue with SeaBIOS not being able to boot from its drive, but telling SeaBIOS to start grub instead allows booting. I'm not sure why. Might have something to do with how Debian was installed on that machine. Oh well.